Whether your window tint is bubbling, fading, or just not your style anymore, knowing how to remove window tint from a car is a valuable skill. At Tint SoCal, we understand the appeal of a fresh, clean window—especially if you’re upgrading your tint or going for a different look.
Removing tint at home is totally doable, but it requires patience and the right technique to avoid damaging your windows or leaving sticky residue behind. Let’s walk you through the process step-by-step.
Why People Remove Window Tint
There are several reasons you might be thinking about removing your window tint:
- Bubbling or Peeling: Over time, lower-quality tints can degrade, creating an unsightly mess.
- Discoloration: Sun exposure can turn some tints purple or hazy.
- Legal Issues: Not all tints meet local regulations for darkness or reflectivity.
- Personal Preference: Maybe it’s just time for a change or a tint upgrade.
No matter your reason, knowing how to do it properly can save you time and frustration.
What You’ll Need
Before you start, grab these tools:
- A heat gun or hair dryer
- Razor blade or scraper (plastic preferred to avoid scratches)
- Ammonia-based cleaner or soapy water
- Spray bottle
- Garbage bags
- Paper towels or microfiber cloths
- Gloves and a mask (especially if you’re using ammonia)
Method 1: The Heat Method (Recommended for DIYers)
This is the most common and safest way to remove window tint, especially for rear and side windows.
Step-by-step:
- Warm the Tint:
Use a heat gun or hair dryer to warm a corner of the tint. Hold it a few inches away and heat it for 30-60 seconds. - Peel Slowly:
Start at the corner and gently peel the tint off. Use a razor blade or fingernail to lift the edge if needed. Keep applying heat as you pull. - Remove Residue:
After removing the film, you’ll likely be left with sticky adhesive. Spray the area with your cleaner and let it soak for a minute. - Scrape Clean:
Use a scraper to remove the softened glue. Wipe clean with a microfiber cloth.
Method 2: The Bag & Ammonia Method (Great for Rear Windows)
If your tint is old or stubborn, this method works great, especially when combined with sunlight.
Steps:
- Spray Ammonia:
In a well-ventilated area (or outdoors), spray the inside of the tinted window with ammonia. - Apply a Black Trash Bag:
Press a black plastic garbage bag against the inside of the window to trap the heat and moisture. - Let It Sit:
Park your car in the sun for 30-60 minutes to let the ammonia and heat break down the adhesive. - Peel and Scrape:
Peel off the tint and scrape off any leftover glue.
Tip: Always protect your interior panels and rear defroster lines. If you’re unsure, it’s best to call in professionals.
When to Call the Pros
While DIY can be satisfying, professional help guarantees no damage and a perfect finish—especially if you’re prepping for new tint installation. At Tint SoCal, we not only remove window tint safely, but we also offer premium reinstallation options, including:
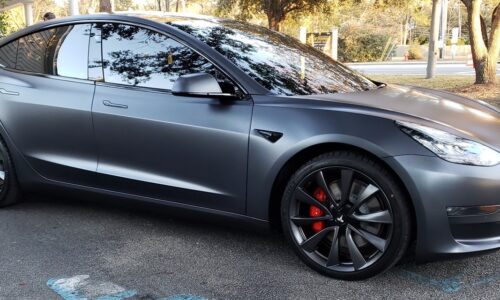
- Tesla Window Tinting: Protect your investment with high-performance film tailored for Tesla models.
- Tesla Paint Protection Film (PPF): Going beyond glass, we offer protection for your paint too.
- Mobile Auto Tinting in Orange County: Don’t want to drive? We come to you—convenient and hassle-free.
Common Mistakes to Avoid
- Using metal blades on defroster lines: This can permanently damage them.
- Skipping the heat or ammonia: This makes peeling harder and leaves more glue.
- Rushing the process: Patience equals better results and less mess.
- Ignoring safety: Always wear gloves and work in a ventilated area.
Final Thoughts
Removing window tint from your car is a process that requires care—but it’s totally achievable with the right tools and steps. Whether you’re doing it yourself or want a professional touch, Tint SoCal has your back. Our expert team is ready to remove old tint and install sleek, new film that fits your style and needs.
Ready for a tint refresh? Explore our Tesla tinting services or schedule a visit from our mobile tinting team. Want full-body protection? Check out our Tesla PPF offerings too.
Let’s give your car the clean, sharp look it deserves.